

Overview
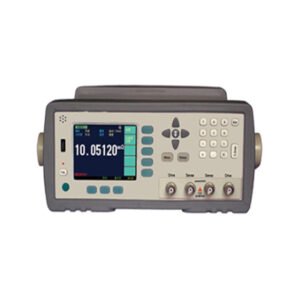
Enviro Test Construct Milliohm Meter with Auto shutdown feature adopts high- performance 32-bit ARM processor. It is a meter with high accuracy and wide measurement range. Its unique feature of current testing mode can adapt different testing requirements. A long time accurate and convenient measurements of passive components can be achieved in all occasions with a wide measurement range from 10 uΏ to 20 MΏ and maximum reading 20000 digits. It can guarantee 0.05 % accuracy even under the condition that the testing speed is under 15/s. This device is also equipped with mini-USB interface to apply to remote control, data acquisition and analysis.
Features
- Measurement range of 10 μΩ to 20 MΩ with 0.05 % accuracy
- Low current mode available on both testers, high current available
- Seven manual/auto ranges
- Dual-colour protective cast shell casing
- Battery and external power supply
- Automatic power off function
- ABS/PER/SEQ comparison criteria
- 5″ full colour screen
- Auto zero adjust for each range
- Four terminal resistance measurement
- Mini-USB interface
- SCPI-compatible command sets
- Keypad lock function
- Background lightness adjustment function
- Automatic shutdown when left idle
Technical Specifications
| Parameters | DC Resistance | |
| Adjustment | Short circuit zero adjust for each range | |
| Comparator | Built-in sorting record, GD/NG sorting result display | |
| Measurement Current | I – Max : < 1A Current mode : high current, low current | |
| Measurement Range | 10 uΏ – 20 MΏ | |
| Accuracy | 0.05 % | |
| Trigger | Internal, manual and remote | |
| Test Lead | ||
| Temperature Compensation | Accuracy : 0.02 C Measurement Range: 32 ◦F to 176 ◦F (0 ◦C to 80 ◦C) | |
| Interface | ||
| Max Reading | 2000 digits | |
| Result Display | ABS, PER, SEQ compare way | |
| Speed | 30 times per second, 15 times per second, 3 times per second | |
| Weight | 1.10 lbs (500 g) | |
| Dimensions | 8.29 in x 5.12 in x 1.49 in (210.76 mm (Length)*130.23 mm (Width)*37.88 mm (Height)) | |
| Humidity | ≤ 65 % RH | |
| Correction | Short-circuit clear zone | |
| Warming Time | > 60 min | |
| Adjustment Time | 12 months | |
| Working Environment | Normal Temperature 59 ◦F to 95 ◦F ( 15 ◦C to 35 ◦C) | Humidity < 80 % RH |
| Working Temperature: 50 ◦F to 104 ◦F (10 ◦C to 40 ◦C) | Humidity 10 to 90 % RH | |
| Storage Temperature: 32 ◦F to 122 ◦F (0 ◦C to 50 ◦C) | Humidity 10 to 90 % RH | |
| High Current Mode | ||
| Speed | Fast 30 times/sec | |
| Med 15 times/sec | ||
| Slow 3 times/sec | ||
Additional Information

Main Functions
Correction
Short-circuit correction for all ranges
Comparator (Sorting Function)
Set up sorting function to do GD/NG sorting
- Comparator Methods:
Absolute value of tolerance ±TOL sorting
Percentage tolerance %TOL sorting
Sequence comparison sorting
- Beep Feature:
Beep: OFF/GD/NG
Interface:

- USB Host Port
- Mini-USB Slave Port
- Reserved Interfaces
- Power Adaptor
Power Supply
The instrument can be powered by Li battery. When the battery is low, only power adaptor can charge the battery.

Charge the Battery
Use the power adaptor to charge the battery. The power key is orange when charging the battery even the instrument turned off. When the battery is full, the indicator is out.

Turn On/Off
Press power key softly to start or turn off the instrument
<MEAS DISPLAY>Page
Press [MEAS] to enter <MEAS DISPLAY>Page.
The [MEAS] page includes following setup:
- Trigger
- Range
- Mode– Current Mode
- Speed – Test Speed
- Comparator– Sorting Settings
- Beep – Beep Settings

[TRIGGER]
Internal trigger, manual trigger and remote trigger
| Trigger | |
| Internal | Internal Trigger |
| Manual | Press [Enter] once, the instrument runs a test cycle |
| Remote | Received a RS-232 trigger command, the instrument runs a test cycle |
[RANGE]
Instrument has three range modes:
| Range | Pros | Cons | |
| Auto | Automatically select the best according to impedance range is automatically set | Very convenient | Test speed is slower than manual ranging |
| Manual | The instrument will always use the user specified range | Highest speed | Set the range previously |
| Nominal | Automatically select the best range according to nominal value | Best mode in sorting | Only availabe in sorting mode |
Measurement Range
| Range | Measurement Range | |
| 9 | 20 MΏ | 2 MΏ to 20 MΏ |
| 8 | 2 MΏ | 200 KΏ to 2 MΏ |
| 7 | 200 KΏ | 200 KΏ to 2 KΏ |
| 6 | 20 KΏ | 20 KΏ to 200KΏ |
| 5 | 2 KΏ | 2 KΏ to 20 KΏ |
| 4 | 200 Ώ | 200Ώ to 20 KΏ |
| 3 | 20 Ώ | 20 Ώ to 200 Ώ |
| 2 | 2 Ώ | 2 Ώ to 20 Ώ |
| 1 | 200 MΏ | 20 MΏ to 200 MΏ |
| 0 | 20 MΏ | 0 to 20 MΏ |
Current (Mode)
Instrument includes two current modes:
High current and low current modes
| Range | High Current mode | Low current mode |
| 0 | 100 mA | 100 mA |
| 1 | 100 mA | 100 mA |
| 2 | 100 mA | 10 mA |
| 3 | 10 mA | 1 mA |
| 4 | 1 mA | 100 uA |
| 5 | 1 mA | 100 uA |
| 6 | 100 uA | 10 uA |
| 7 | 10 uA | 10 uA |
SPEED
Slow, Med and Fast can be selected
Slow mode will result in more stable and accurate measurement result
Comparator (COMP)
Set the comparator parameter in <COMP SETUP> page
<COMP SETUP>Page
Press [MEAS] to enter <MESA DISPLAY> page, select [COMP SETUP] to enter<COMP SETUP>page.
COMP – On/Off
BEEP –OFF/GD.NG
MODE – Sorting methods
NOM – Input Nominal Value
LOW– Input low limited value
HIGH – Input high limited value.

Comparator [MODE]
Procedure to set comparator mode:
| Step 1 | Press <Meas Display> page |
| Step 2 | Select (Comp setup) to enter <Comp setup> page |
| Step 3 | Use cursor key to select [ Mode] |
| Step 4 | ABS Result – nominal |
| PER % (Result – nominal ) / nominal x 100 % | |
| DIRECT SEQ Compare result with low high limited values |
Comparator [NOM]
Nominal value must be positive
Procedure to input nominal value:
| Step 1 | Press [MEAS] to enter <MEAS DISPLAY> page |
| Step 2 | Select [COMP SETUP] to enter <COMP SETUP> page. |
| Step 3 | Use cursor key to select [NOM] |
| Step 4 | Input the nominal value |
Comparator [LOW] and [High]
- ABSΔ — Input the absolute value of parameter.
 PERΔ%— Input the relative value of parameter in %.
- Direct SEQ — Input the direct value of parameter.
- Procedure to input high/low limited values: /9*-
 PERΔ%— Input the relative value of parameter in %.
[BEEP] Feature:
Procedure to set the beep
| Step 1 | Press [Meas] key to enter measurement range | |
| Step 2 | Use the cursor key to select [SPEED] field | |
| Step 3 | OFF | Turn beep off |
| GD | Beep while pass | |
| NG | Beep while fail | |
Icons on <MEAS Display>
| Icon | Description |
 | Powered by Li battery |
 | Powered by external power supply |
 | USB-Disk is available |
| H | Hold current data |
< SETUP> page
Press [Setup] key to enter <SETUP>page.
In <SETUP> page, if the testing is not progress the Instrument does not display the measurement result and comparator result.
The <SETUP> page includes following setup:
- Trigger Mode [TRIGGER]
- Measurement Range [RANGE]
- Test Speed [SPEED]
- Comparator [COMP] ON/OFF
- BEEP Feature
- Soft key CLEAR ZERO – Clear Zero Correction
- RESMODE – AC Resistance Sorting Methods
- VOLTCOMP– DC Voltage Sorting Methods
- ResNom – Input Resistance Nominal Value
- ResLow – Input Resistance Low Limit
- ResHigh – Input Resistance High Limit
- VoltNom – Input Voltage Nominal Value
- VoltLow – Input Voltage Low Limit
- VoltHigh – Input Voltage High Limit
Some settings can be also set up in <MEAS DISPLAY> page.

Short-circuit Clear Zero [CLEAR ZERO]
Press [Setup] key to enter < SETUP> page, and then press [CLEAR ZERO] soft key to do short-circle clear zero. Once it’s done with short-circuit clear zero the value will be saved into internal flash disk.
Note:
It is necessary to do short-circle clear zero. When replace the test fixture or test cables, it is must to do short –circle clear zero.
Connect the test clip as shown in the below figure.

RS232 [BAUD] rate
Connect the instrument to computer via Mini-USB to RS-232 port and the instrument will communicate with PC, meanwhile the keypad will be locked. Use the SCPI language in Mini-USB programming.
Mini-USB to RS232 format:
- Data bits: 8
- Stop bits: 1
- Parity: none
| Step 1 | Press [SYSTEM] bottom soft key to enter <SYSTEM CONFIG> page | |
| Step 2 | Use the cursor key to select [BAUD] field | |
| Step 3 | 1200 | For the communication, converter opt with coupler isolation |
| 9600 | ||
| 38400 | ||
| 57600 | ||
| 115200 | Best for communication with PC | |
<SYSTEM INFORMATION>

| Step 1 | Press [Meas] or <Setup>key to enter main page |
| Step 2 | Press bottom soft key [SYSTEM] to enter <SYSTEM CONFIG> |
| Step 3 | Press soft key [SYSTEM INFORMATION] to enter <SYSTEM INFORMATION> page |
AC Resistance Range:
| Range | Max. Reading | Resolution | FAST | MED | SLOW | Test Current | |
| 0 | 20 mΩ | 22.00 mΩ | 0.01 mΩ | 0.8% ± 5 | 0.6% ± 3 | 0.5% ± 2 | 10 mA |
| 1 | 200 mΩ | 220.0 mΩ | 0.1 mΩ | 0.8% ± 4 | 0.6% ± 3 | 0.5% ± 2 | 1 mA |
| 2 | 2 Ω | 2.200 Ω | 1 mΩ | 0.8% ± 4 | 0.6% ± 3 | 0.5% ± 2 | 0.1 mA |
| 3 | 20 Ω | 22.00 Ω | 10 mΩ | 0.8% ± 4 | 0.6% ± 3 | 0.5% ± 2 | 10 µA |
| 4 | 200 Ω | 220.0 Ω | 100 mΩ | 0.8% ± 4 | 0.6% ± 3 | 0.5% ± 2 | 5 µA |
| 5 | 2 kΩ | 2.200 kΩ | 1 Ω | 0.8% ± 4 | 0.6% ± 3 | 0.5% ± 2 | 2 µA |
Open-circuit Voltage: < 30 mVrms | |||||||
DC Voltage Range:
| Range | Max. Reading | Resolution | FAST | MED | SLOW | |
| 1 | 5.0000 V | 5.0000 V | 0.0002 V | 0.5% ± 4 | 0.5% ± 2 | 0.1% ± 5 |
| 2 | 50.000 V | 50.000 V | 0.002 V | 0.5% ± 4 | 0.5% ± 3 | 0.1% ± 5 |
Room Temperature Calibration
As the temperature probe was installed inside the instrument. It will cause deviation in measuring, especially in highest brightness. You need to calibrate the room temperature. Brightness to be adjusted to 50 % or less and warming time must be more than 15 minutes.
Procedure to calibrate temperature:
| Step 1 | Press [Setup] to enter <SETUP DISPLAY>page |
| Step 2 | Select [TEMP CALIBRATE] |
| Step 3 | Select [OK] |
| Step 4 | Input the temperature value and press [Enter] to finish |
Reset Room Temperature Calibration Factor
To reset the temperature calibration Factor that set at [TEMP CALIBRATE].
| Step 1 | Press [Setup] to enter <SETUP DISPLAY>page |
| Step 2 | Select [TEMP RESET] |
| Step 3 | Press [OK] to finish temperature reset |
<SYSTEM CONFIG>page
LANGUAGE
DATE/TIME
ACCOUNT
Backlight-LED [BkLed]
SHUTDOWN
All settings in <SYSTEM CONFIG> will be saved automatically

[LANGUAGE]
Procedure to change language:
| Step 1 | Press [MEAS] or [Setup] to enter main page |
| Step 2 | Press bottom soft key [SYSTEM] to enter <SYSTEM CONFIG> |
| Step 3 | Use cursor keys to select[Language ] |
[ACCOUNT], [PASSWORD]
ADMIN – Except [SYSTEM SERVICE], all settings are available and can be saved in ADMIN section.
USER – Except [SYSTEM SERVICE], all settings are available but cannot be saved in USER section.
Procedure to set account:
| Step 1 | Press [MEAS] or [Setup] to enter main page |
| Step 2 | Press bottom soft key [SYSTEM] to enter <SYSTEM CONFIG> |
| Step 3 | Use cursor key to select[ACCOUNT] |
| Step 4 | Except <SYSTEM SERVICE>, all settings are available and can be saved in ADMIN section Except<SYSTEM SERVICE>, all settings are available but cannot be saved in USER section |
Procedure to Set Password
| Step 1 | Press [MEAS] or [Setup] to enter main page |
| Step 2 | Press bottom soft key [SYSTEM] to enter <SYSTEM CONFIG> |
| Step 3 | Use cursor key to select [PASSWORD] |
| Step 4 | No more than 9 digits and only digits and letters can be input. Contact us if you forget your password to CHANGE PASSWORD/ DELETE PASSWORD |
[DATE], [TIME]
The instrument uses a 24-hour time
| Step 1 | Press [MEAS] or [SETUP] to enter main page |
| Step 2 | Press bottom soft key [SYSTEM] to enter<SYSTEM CONFIG> |
| Step 3 | Use cursor keys to select [DATE] |
| Step 4 | YEAR INCR+ YEAR DECR- MONTH INCR+ |
Procedure to set time:
| Step 1 | Press [MEAS] or [SETUP] to enter main page |
| Step 2 | Press bottom soft key [SYSTEM] to enter<SYSTEM CONFIG> |
| Step 3 | Use cursor keys to select [TIME] |
| Step 4 | HOUR INCR+ HOUR DECR- MINUTE INCR+ MINUTE DECR- SECOND INCR+ SECOND DECR- |
Procedure to set background brightness:
| Step 1 | Press [MEAS] or [SETUP] to enter main page |
| Step 2 | Press bottom soft key [SYSTEM] to enter<SYSTEM CONFIG> |
| Step 3 | Use cursor keys to select [BKLed] |
| Step 4 | Bright 10 % Low power Bright 25 % Default set Bright 50 % Bright 75 % Bright 100 % High power |
[SHUTDOWN]
Procedure to set auto power off:
| Step 1 | Press [MEAS] or [SETUP] to enter main page |
| Step 2 | Press bottom soft key [SYSTEM] to enter<SYSTEM CONFIG> |
| Step 3 | Use cursor keys to select [SHUTDOWN] |
| Step 4 | 5 MIN default set 15 MIN 30 MIN 60 MIN OFF |

Reviews
There are no reviews yet.